 01642 224544
Welcome, aspiring hydroponic masters! One of the most empowering skills you can develop as a grower is the ability to take your own cuttings, also known as clones. Why is this such a game-changer? Imagine replicating your absolute best-performing plant – the one with the highest yields, the most vigorous growth, or the most desirable characteristics – perfectly, every single time. That’s the magic of cloning.
Taking cuttings allows you to bypass the variability of seeds, save significant money, and ensure genetic consistency across your entire crop. It’s a technique that truly levels up your growing game, moving you from simply "growing plants" to "cultivating specific genetics." While it might seem intimidating at first, with the right equipment and a methodical approach, anyone can achieve high success rates.
At Great Stuff Hydroponics, we’re passionate about empowering growers with expert knowledge. This guide will break down the process of taking cuttings into simple, actionable steps, highlighting the essential tools you’ll need to ensure your cloning success.
Why Clone? The Unbeatable Advantages
Before we dive into the 'how,' let's quickly reinforce the 'why':
- Genetic Consistency: Every clone is an exact genetic replica of its 'mother' plant. This means predictable growth patterns, flowering times, and yields.
- Faster Turnaround: Cuttings are already in a vegetative state, significantly shortening the time from propagation to harvest compared to growing from seed.
- Cost-Effective: Once you have a mother plant, you can generate an endless supply of new plants without continually buying seeds.
- Preservation of Genetics: If you find a truly exceptional plant, cloning allows you to preserve and perpetuate its unique traits for future grows.
Essential Equipment for Cloning Success
Think of cloning as a surgical procedure for plants. Just like a surgeon, you need a sterile environment and specialised tools. Investing in the right equipment upfront will dramatically improve your success rates and make the process far more enjoyable.
1. The Mother Plant: Your Genetic Goldmine
The quality of your cutting directly depends on the health of your mother plant. A stressed, nutrient-deficient, or pest-ridden mother will produce weak cuttings that are reluctant to root.
- Selection: Choose a mother plant that is healthy, vigorous, and in its vegetative growth stage (not flowering). It should be at least 4-6 weeks old and well-established.
- Preparation: About a week before taking cuttings, give your mother plant a light feed with a vegetative nutrient solution like Canna Terra Vega, ensuring it's well-hydrated. Avoid heavy feeding right before, as excessive nitrogen can make stems too soft.
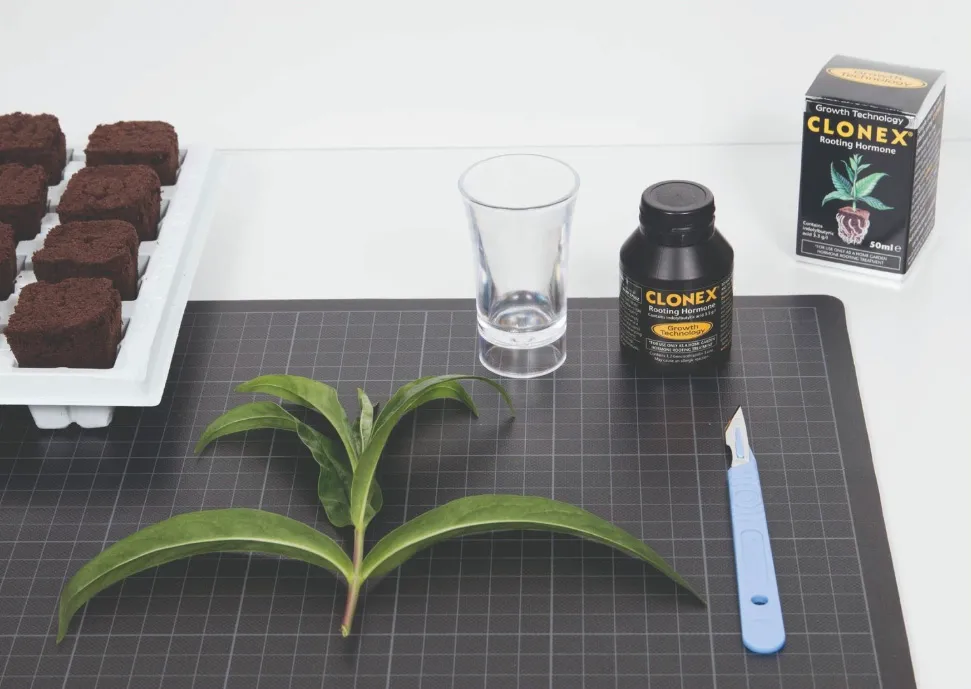
2. Sterile Cutting Tools: Precision is Key
This is where many beginners go wrong. Using blunt or dirty tools can crush plant tissue, introduce pathogens, and significantly hinder rooting.
- Scalpel or Sharp Scissors: A sterile, sharp scalpel or a pair of specialised pruning scissors (AC Infinity Stainless Steel Pruning Shear) is non-negotiable. The goal is a clean, swift cut.
- Sterilisation Solution: Always sterilise your tools with isopropyl alcohol (rubbing alcohol) or a dilute bleach solution before and after each use, and even between different mother plants to prevent cross-contamination. Another option is Silver Bullet Mist which is a handy little spray that can be used all over your grow room to disinfect and sterilise.
3. Rooting Medium: The First Home
Your cuttings need a stable, moist, and aerated substrate to encourage root development. There are several excellent options:
- Rockwool Cubes: These are popular due to their inert nature and excellent water retention and aeration. Always pre-soak rockwool cubes in a pH-adjusted solution (around 5.5-6.0) for at least an hour before use.
- Root Riot Cubes / Jiffy Pellets: Made from organic materials, these are often favoured by organic growers. The Root Riot cubes come pre-moistened and have a good air-to-water ratio. Find them both in our propagation media section.
4. Rooting Hormone: The Catalyst for Growth
This is where you give your cuttings a powerful nudge towards root development. Rooting hormones contain auxins, plant hormones that stimulate cell division and root formation.
- Clonex Rooting Gel: The industry standard. Simply dip the cut end of your cutting into the gel before placing it in your rooting medium. Clonex Gel creates a seal around the wound, protecting it from pathogens and delivering the hormones directly.
- Rooting Powders/Liquids: Other effective options are available like Rhizopon Chryzotop Green 0.25% Rooting Hormone which is a ready to use powder or BAC's Bio Clone a 100% natural, hormone-free rooting gel. Ensure you choose one suitable for hydroponic use.
5. Propagation Environment: The Nursery
Cuttings are fragile and highly susceptible to drying out before they develop roots. A humid, stable environment is crucial.
- Propagation Dome/Humidity Dome: A propagation dome creates a mini-greenhouse effect, maintaining high humidity around your cuttings. Look for domes with adjustable vents for controlled airflow like the ones available in our Plant Propagators section.
- Heated Propagator (Optional but Recommended): For faster rooting, especially in cooler environments, a heated propagator provides gentle bottom heat (around 22-25°C) which encourages root development.
- Lighting: Cuttings need light, but not intense light. A single fluorescent T5 grow light or a low-wattage LED fixture positioned 30-45cm above the dome is ideal. They need around 18 hours of light per day. Head to the Propagation Lighting page for options.
The Gorilla Propagation LED Kit is also available giving you both a propagator and LED strip lights in one package, saving you time and money.

6. Nutrient Solution (for early life): Gentle Beginnings
Once roots appear, you'll need a very dilute nutrient solution.
- Mild Vegetative Feed: A quarter to half-strength hydroponic vegetative nutrient solution, specifically formulated for young plants. Canna Start or Shogun Start are great options, others are available from the Propagation Nutrients page.
- pH and EC Meters: Essential for monitoring your solution. A digital pH meter and EC meter ensure your young plants get precisely what they need. All available in pH Management.
The Step-by-Step Guide to Taking Cuttings
Now that you have all your tools ready, let’s get into the action!
Step 1: Prepare Your Work Area and Mother Plant
- Sanitise: Lay down a clean surface. Sterilise your scalpel/scissors and hands thoroughly.
- Hydrate Mother: Ensure your mother plant has been well-watered the day before.
- Pre-soak Medium: If using rockwool, pre-soak your cubes in pH-adjusted water (5.5-6.0) for at least an hour, or level up and add some Growth Technology Formulex.
- Set Up Dome: Place your rooting medium in your propagation tray within the dome.
Step 2: Select and Cut the Cuttings
- Identify Good Branches: Look for healthy, vigorous new growth from the tips of branches. Ideal cuttings are 5-10cm long with 2-4 nodes (points where leaves emerge). Avoid old, woody growth or overly soft, new growth.
- Make the Cut: Using your sterile scalpel or sharp scissors, make a clean, diagonal 45-degree cut just below a node. A diagonal cut increases the surface area for rooting.
- Immediate Transfer: As soon as you make the cut, immediately place the cutting into a glass of plain, pH-adjusted water. This prevents air bubbles from forming in the stem, which can block water uptake. Work quickly to minimise stress.
Step 3: Prepare the Cutting
- Remove Lower Leaves: While the cutting is submerged in water, carefully remove any leaves from the bottom node(s) that would be below the surface of your rooting medium. This prevents them from rotting and causing disease.
- Trim Fan Leaves (Optional but Recommended): For larger leaves, you can trim half to two-thirds off the ends of the remaining fan leaves. This reduces transpiration (water loss) while the cutting is trying to establish roots.
- Re-cut the Stem (Optional but Recommended): Just before dipping in rooting gel, make another tiny, fresh diagonal cut on the very tip of the stem. This ensures a fresh wound for optimal hormone absorption.
Step 4: Apply Rooting Hormone
- Dip: Dip the freshly cut end of the stem into your chosen rooting gel (e.g., Clonex). Ensure the cut surface is completely coated. Don't double-dip; if you need more gel, pour a small amount into a separate sterile dish.
Step 5: Plant the Cutting
- Insert into Medium: Gently insert the dipped cutting into a pre-made hole in your chosen rockwool cube or rooting plug. Ensure it's firm but not crushed. The bottom nodes where you removed leaves should be buried.
- Label: If you’re cloning different strains, label each section of your propagator clearly!
Step 6: Place in Propagator and Provide Environment
- Dome: Place your planted cuttings into the propagation dome.
- Humidity: Aim for high humidity (75-95%) inside the dome initially, a room hygrometer like the ETI Dial Hygrometer will help keep you right. Keep the vents closed for the first few days.
- Temperature: Maintain an ambient temperature of 22-25°C. If using a heated propagator or heat mat, set it to this range.
- Light: Position your T5 or low-wattage LED about 30-45cm above the dome for 18 hours per day.
.webp)
Caring for Your Cuttings: The Waiting Game
The rooting process typically takes 7-14 days, though some strains can take longer. Patience is crucial!
- Mist Regularly: For the first 3-5 days, mist the inside of the dome and the leaves of your cuttings with plain, pH-adjusted water once or twice a day to maintain high humidity.
- Air Exchange: After the first few days, slightly open the vents on your dome for an hour or so each day to allow for some air exchange and prevent stagnant air (which can lead to mould). Gradually increase this ventilation as roots appear.
- Moisture Check: Ensure your rooting medium remains consistently moist, but not waterlogged. Lift the dome occasionally to check the weight of the tray. If using rockwool, the cubes should feel light but not dry. You can carefully add a small amount of pH-adjusted water to the base of the propagation tray if needed, but avoid overwatering.
- Nutrients (Once Roots Appear): Only once you start seeing white roots emerging from your rooting medium should you begin a very dilute nutrient feed. Start with a quarter-strength vegetative nutrient solution, maintaining a pH of 5.8-6.0.
- Hardening Off: Once roots are well-developed (2-3cm long), gradually 'harden off' your cuttings. This means slowly reducing the humidity by opening the dome vents more and more over a few days until the dome can be removed entirely. This prepares them for the less humid environment of your main grow space.
Troubleshooting Common Cloning Problems
Cuttings Wilting Heavily:
- Too Low Humidity: Increase misting and ensure dome vents are closed.
- Air Bubble in Stem: You may not have transferred fast enough to water, or made a clean enough cut.
- Too Much Light: Raise your light or reduce intensity.
No Roots After 2-3 Weeks:
- Temperature Too Low: Ensure propagator temperature is 22-25°C.
- Dirty Tools/Disease: Could be due to unsanitary conditions.
- Poor Mother Plant Health: Weak mother produces weak cuttings.
- Incorrect pH of Medium: Check your pH pre-soak.
Mould/Slime:
- Too High Humidity/Lack of Air Exchange: Increase ventilation.
- Rotting Leaves: Ensure all leaves below the medium surface are removed.
- Dirty Environment: Thorough cleaning is crucial.
Conclusion: Your Journey to Self-Sufficiency Begins
Mastering the art of taking cuttings is a fundamental skill that transforms your hydroponic journey. It’s a process that requires attention to detail, a sterile approach, and a bit of patience, but the rewards are immense. From consistent genetics to cost savings and faster crop cycles, cloning empowers you with ultimate control over your garden.
Don't be discouraged by initial setbacks; every expert started as a beginner. With the right propagation equipment and the expert knowledge shared here, you’ll soon be cloning like a seasoned pro, creating an endless supply of your favourite, high-performing plants. Happy cloning!